 |
| waiting for papa |
despite the lack of posts i have been somewhat busy with a number of things including painting. i spent another frustrating few hours trying to figure out how to get digital video out of the camera onto my computer and into the editing software. doesn't seem to do it on the pc laptop but
imovies on my spouse's macbook does at least download the video. i just don't know how to edit it yet in that program and of course she needs the computer so i have to pick and choose the time. the net result of all this is that i have no video to show you yet. i'll keep working on it.
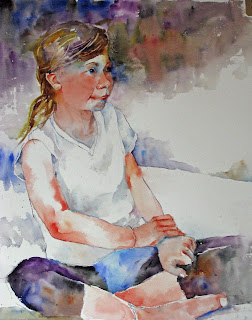
i have done a painting of our granddaughter sophie from a photo i took while she waited for her dad to arrive by plane to take her back to portland after a month-long trip to the wicked grandparents. i was lazy and didn't chronicle the steps as i usually do. here is the finished product:
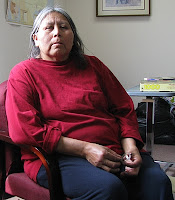 |
| reference photo |
yesterday i started another portrait/painting of a lakota woman i know who lives out on pine ridge marlene. i did one earlier but i wanted to do more of a figure this time and include her hands which are very expressive. i started, as usual, with a modified contour/gesture drawing in hb pencil (i am using a mechanical pencil now as it always stays sharp!) using the photo for the source material. i thought that the main color grouping for the last painting (quinacridone gold and alizarin crimson permanent) was too warm and red so i am going to try to do this one using cobalt blue and burnt sienna for the base flesh colors. also i put down an initial wash last time and i am going to start right in with the features and modeling leaving the white of the paper for the (high)lights.
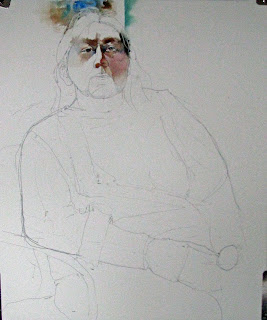 |
| drawing and initial washes |
i started with the nose and painted the under plane with a #6 round and then after cleaning and shaking it damp pulled the pigment both up onto the top of the nose and also down to the upper lip adding a bit more cobalt blue to develop the midtones. the eyes were next using the same colors in slightly different ratios. the sequence that i use for the eyes is the shadow under the upper lid, iris(burnt umber), pulling iris color onto the lower lid with a damp brush, lateral socket plane using mainly cobalt blue, medial socket using a deeper value that is heavy with the cobalt blue and pulling that up over the upper lid and down along the upper medial cheek. i try to make sure all these flow together as one shape except where i leave little islands of paper for definition and highlights. a few notes are in order. on the iris i usually put pretty much pure tube color down over the top third to half of the shape leaving the paper white for the important highlight and then pull the pigment down to complete the shape with a clean damp brush
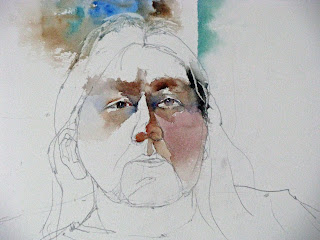 |
| close-up of initial facial washes |
allowing the shadow shape from the upper lid to mix with the iris color. i put in the pupil with ultramarine blue wet-in-wet when the iris is just damp so that i get a bit of a softened edge. i usually lose the edge of the hair in the temple area so putting in a swatch for the hair and texturing it a bit at this time works best for me. hair color is cerulean blue, burnt sienna, ivory black with texture scraped in when the sheen is disappearing off the wash with a palette knife. the *left* cheek is put in by putting a swatch of carmine down just below the eye and then the whole thing pulled downward using the flesh mixture in rolling back-and-forth brush strokes until i reached the neck (don't stop at the jawline) or ran out of paint, which ever comes first. that's as far as i got today and i will try to be more diligent with the description of the steps as we move along. thanks for viewing/following. please comment if you'd like.
life drawing/painting session tonight so i should have a few offerings from that tomorrow. i am going to try to make a decent composition from two of the longer poses on one sheet......we'll see.


These are looking amazing Bob, I do love your style...
ReplyDeleteAs for the camera. You need a fire-wire cable and port on your pc.Then edit in Windows Movie Maker..
thanks for visiting, stephie, and leaving a comment. i appreciate it and, of course, the compliments are too! i will have to try the firewire. our camera records to one of those small dvd's and even a finalized version of the recording won't up load into adobe photoshop premiere elements. maybe the soft ware has a glitch. i'll try the windows editing program.
ReplyDelete